
Administration
For the admins of a workspace: create the workspace, invite the team, split repositories between teams, set up single sign-on, and keep the registry token. Open each page from the workspace menu, the button at the right of the header.
Create a workspace #
- Go to sc.tuxcare.cloud and select the button of your sign-in provider, for example Continue with Google.
- On Your workspaces, type a name in Workspace address. The name becomes the address of the workspace, for example
acme.sc.tuxcare.cloud. - Select Create workspace, then Open. You are the first admin.
- Invite your team, and send the first scan: see Get started.
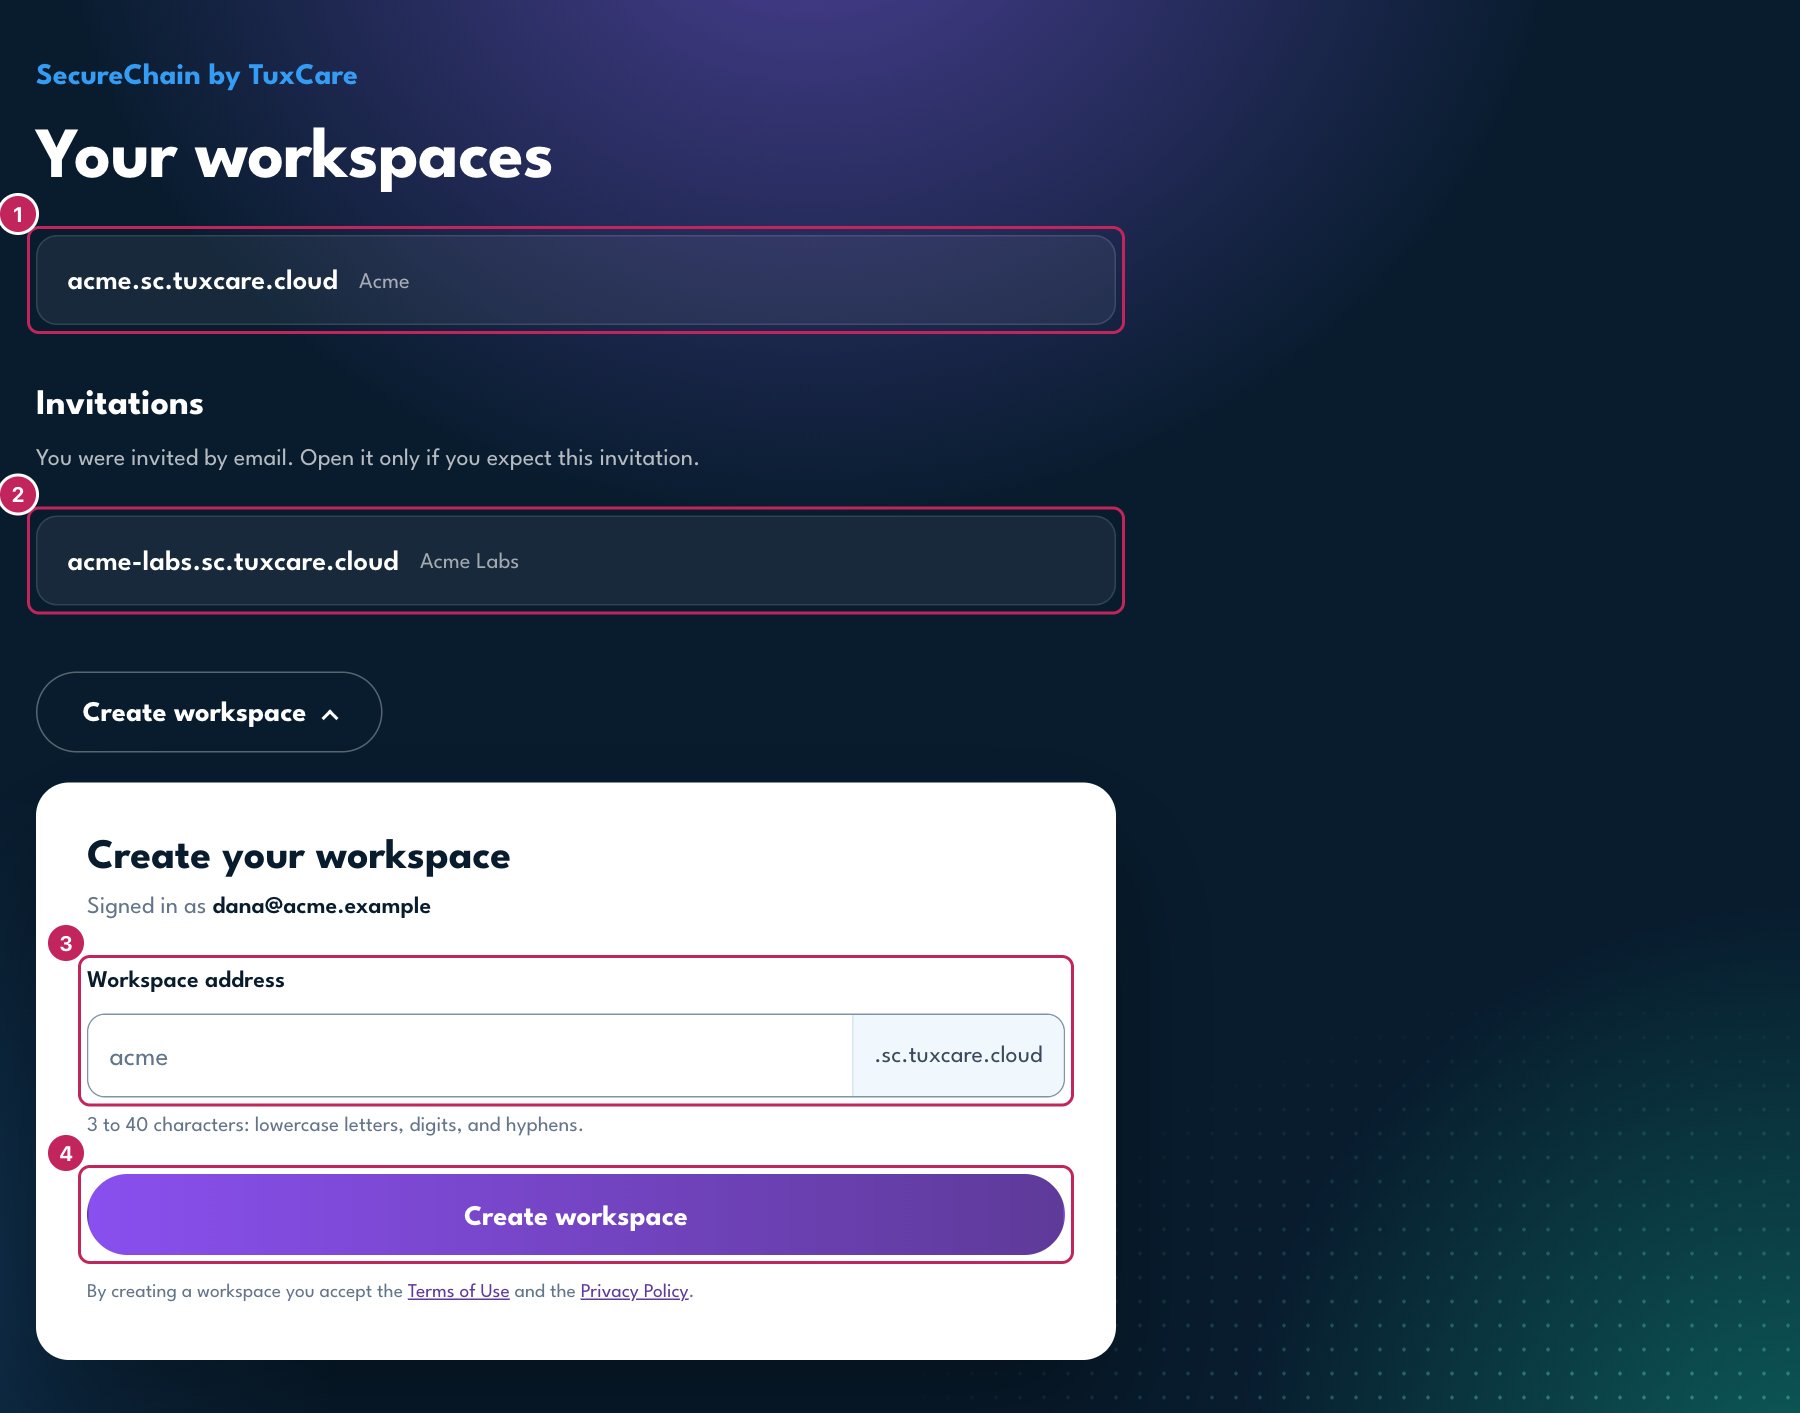
- The workspaces that you can open. Select one to go to it.
- Your invitations. Open one only if you expect it.
- The address of the new workspace.
- Create workspace makes the workspace.
Workspace name rules #
- 3 to 40 characters: lowercase letters, digits, and hyphens. No hyphen at the start or at the end.
- The name cannot start with
xn--, and characters 3 and 4 cannot be--. - Some names are reserved, for example
www,api,auth,admin, andstatus. - Each name is unique. If another workspace has it, the page shows
subdomain is in use
.
Users #
Open Users. Each user has one role for the whole workspace: admin, member, or viewer. Roles lists what each role can do.
- Invite: type the email address, the name, and the role, then select Invite. The person signs in at sc.tuxcare.cloud with that email address. The user is
Pending
until the first sign-in. Resend invitation sends the email again. - Join by email domain: under Settings › Sign-in, select Edit under Join by email domain, type the domains of your company, and select the role (member or viewer). Everyone with a Google Workspace account in those domains can then join with no invitation. You can add a domain only after a person of the workspace signed in once with an address at that domain. Free-mail domains such as gmail.com are refused.
- Change a role: use the role list on the row of the user.
- Disable: select Disable. The user cannot sign in, and the tokens of the user stop. Enable reverses it. The portal does not delete users, so the audit log keeps their names.

- The invitation form.
- The role of a user.
- Resend invitation and Disable.
The workspace always keeps one active admin. You cannot remove the admin role from the last admin, or disable the last admin. A user marked Email stopped
has an address that bounced: see Email that does not arrive.
Departments #
Departments split the repositories of a workspace between teams. A member or a viewer with a seat in a department sees only the repositories of that department.
- Open Departments. Type a name and select Create department.
- Open the department. Under Repositories, add the repositories of the team.
- Under Members, add the members and viewers of the team.

- The form that creates a department.
- The members of the department.
- The repositories of the department.
- Admins, and users with no seat, see every repository.
- A repository can be in more than one department. A repository in no department is visible only to admins and to users with no seat.
- A seat never gives more than the role of the user. A viewer stays a viewer.
- The token of a user with a seat sends scans only to the repositories where a seat gives the member role.
- Members can add repositories. When a member with a seat sends a scan of a new repository, the portal adds the repository to each department where the member has a member seat. The switch Members can add repositories on the Departments page controls this. It is on by default. When it is off, only an admin or a department token can add a repository.
- When you delete a department, its repositories go back to no department, and the portal revokes its department tokens. The portal asks you to confirm.
- A department controls who sees a repository. A product groups repositories for the CRA clocks. The two are separate.
Single sign-on #
Add the identity provider of your organization under Settings › Sign-in. The portal supports Google, Microsoft Entra ID, any OpenID Connect provider, and SAML 2.0.
- Select the type, and type an id and a button label.
- Fill in the fields of the provider: the issuer URL, the client id, and the client secret for OpenID Connect, or the IdP metadata for SAML.
- Copy the Callback URL (OpenID Connect), or the ACS URL and the Entity ID (SAML), into the provider.
- Set Allowed domains to your email domains. The portal refuses free-mail domains.
- Select the provisioning mode.
invite
lets only invited addresses sign in.jit
makes a user at the first sign-in, with the Default role. - Select Test. Then sign in with the new button in a private browser window.

- The type of the provider.
- The allowed domains, the provisioning mode, and the default role.
- The callback URL to copy into the provider.
The portal uses the email of a first sign-in only when the provider confirms that the email is verified:
- OpenID Connect: the ID token must say
email_verified: true. If your provider does not send the claim, and nobody can choose an email that they do not own, select Trust unverified email. - Microsoft Entra ID: add the optional claim
xms_edovto the ID token in the app registration. - SAML 2.0: the email of the assertion is enough.
The provider handles multi-factor authentication. The sign-in must start at the portal.
Registry token #
Settings › Registry token keeps the token of the TuxCare registry. The CLI reads it with the access token of a developer or a CI job: securechain registry login on a computer, and securechain registry env in CI. So each person and each pipeline keeps only one secret. You need it only for TuxCare builds.
- Save it one time. Replace it when TuxCare gives you a new one. Then each person runs
securechain registry loginagain. - Leave the user name empty for the TuxCare registry. Set it only for your own mirror that asks for one.
- The section shows who saved the token and when.

The other parts of Settings: Fix deadlines (see Fix deadlines) and API and MCP access (see Turn the API or MCP on).
Audit log #
The Audit log page lists each management action, newest first: when, who, from which address, the action, the object, and the detail. It records token, user, department, repository, product, and triage changes.
- Type in Actor contains to keep the actions of one person or token.
- Type in Action contains to keep one kind of action, for example
token. - The page shows 100 entries. Load older shows the next 100.
Limits #
Your plan sets the limits of the workspace: repositories, users, tokens, webhooks, scans a day, and how long the portal keeps old scans. At a limit, the portal answers with status 429 and names the limit:
{"error":"quota exceeded","quota":"repos","limit":200}- The daily scan limit resets at 00:00 UTC. A repeat of the same scan counts. A failed upload does not.
- Each token can send 10 requests a second, with a burst of 30. Above that, the portal answers 429
rate limited
. - To raise a limit, contact TuxCare.
Manage or delete the workspace #
Sign in at sc.tuxcare.cloud. Your workspaces lists the workspaces that you can open, and your invitations. Manage workspaces lists the workspaces that you own.
To delete a workspace that you own, select it on Manage workspaces, type its name, and confirm. Sign-in and all tokens stop at once. TuxCare removes the data after a retention period.
Before you delete it, download the SBOMs, reports, and VEX files that you want to keep.
Next: Troubleshooting